If you’ve ever hauled out a crumpled, mildewed, half-crushed winter coat from a storage bin only to find it ruined by unclosed bags, you already know the frustration of a bad seal. As a storage bag supplier, I’ve seen this happen dozens of times—customers buy our bags, then cut corners on sealing them, turning a space-saving solution into a $100 laundry mishap. A proper seal isn’t just about zipping and folding; it’s about blocking air, moisture, pests, and dust from ruining your items, and doing it right takes more than a quick glance. Let’s break down the step-by-step, science-backed process to seal your storage bags like a pro, plus the common mistakes even seasoned storage pros make. Storage Bag

First, let’s talk about why sealing correctly matters beyond just saving closet space. I don’t just sell storage bags—I’ve worked with customers who stored wedding dresses, vintage linens, and out-of-season baby gear, all of which turned to mold because they skipped a critical sealing step. Most standard storage bags (the vacuum-sealed or polypropylene kinds we supply) work by creating an airtight barrier that keeps out two big enemies: moisture and airborne contaminants. If that barrier has a single gap, moisture seeps in, creates condensation, and breeds mildew, especially in basements or attics where humidity fluctuates. Pests too—moths, silverfish, even small rodents—can sneak through a 1mm gap in a seal, so a tight seal isn’t just for preserving fabric, it’s for protecting your investment.
Now, let’s get to the step-by-step process, tailored to the two most common types of storage bags we stock: vacuum-sealed compression bags and reusable polypropylene storage bags. The process for each is similar, but there are key tweaks that make a huge difference. Let’s start with vacuum-sealed bags, since those are the top pick for space-strapped customers.
Before you even touch the seal, do a pre-seal check that most people skip: make sure your items are completely dry. This is non-negotiable. I once had a customer send back 50 bags because mold grew on their stored sweaters, and when I inspected the clothes, they’d folded damp towels into the bag to use as padding. Even a tiny amount of moisture from a recently laundered item can turn into a problem over time—laundry that feels “fresh” still has 10-15% residual moisture that’s invisible to the naked eye. If you’re storing items that can’t go in the dryer (like vintage silk), hang them outside on a dry, sunny day for 2-3 hours to let any trapped moisture escape. For machine-washable items, run them on a low-heat dry cycle for an extra 10 minutes to evaporate surface moisture. Skipping this step is like putting a wet dish in a sealed container—condensation is inevitable.
Next, prepare the bag itself. When you unbox a new storage bag, check for any manufacturing defects first—we do quality control on all our bags, but even a tiny scratch on the seal track can ruin the whole thing. Lay the bag flat on a hard surface (not a soft bed or carpet, which can let small debris get trapped in the seal) and smooth out the sides to eliminate wrinkles. Wrinkles in the seal area are one of the biggest causes of leaks—they create tiny gaps that air and moisture can seep through. If you’re putting multiple items in one bag, fold them neatly so they lie flat, not stuffed into a lumpy ball. A lumpy load puts uneven pressure on the seal, making it easier for it to pop open later.
Now, the actual sealing step for vacuum bags: first, the double-zip method. Most vacuum bags have two zippers along the seal track, and a lot of people only zip one, which leaves a gap. Start with the first zipper: pull it all the way along the track, making sure the pull tab locks into the end stop at the edge of the bag. Then, run your finger along the entire track, pressing down firmly to ensure the zipper teeth are fully interlocked—any small piece of lint or fabric caught between the teeth will create a leak. Next, repeat with the second zipper, overlapping it about an inch at the end of the first zipper. That overlap is critical—it creates a secondary seal that blocks any air that might sneak past the first zipper. Once both zippers are done, run a slightly damp paper towel along the seal track. If the towel sticks or moves slowly over any spot, that’s a gap—go back and re-zip that section until the towel glides smoothly.
Then, the valve seal: this is where people mess up most. The valve on vacuum bags is designed to let air out but not back in, so if it’s not closed properly, air will seep back in over time. After you’ve zipped the two zippers, close the valve’s plastic cover firmly—you should hear a small click, and the cover should lie flat, no gaps around the edges. Some bags have a secondary rubber seal around the valve; make sure that’s pressed down all the way too. Once the valve is closed, give the bag a gentle squeeze. If air comes out around the valve, it’s not closed right. If it’s too tight and no air comes out, you’re good to go. Now, attach the manual pump or use your vacuum’s hose (wait, important: if you use a shop vacuum, never use a vacuum with a bag attached itself—dust and debris from your vacuum can get pushed into your storage bag and contaminate your items). Squeeze all the air out slowly, pausing every 10 seconds to check the valve and seals for any signs of bulging air. Once you’re done vacuuming, immediately close the small plastic cap on the valve to lock it in place. I always tell customers to do a “post-vac check”: set the bag on a flat surface for 5 minutes, then press on it. If it puffs back up even a little, there’s a leak somewhere—find the gap, re-seal, and vacuum again.
Now, for reusable polypropylene storage bags, which are great for items you access regularly or don’t want to compress. The sealing process here is similar but has a few key differences. First, these bags don’t use a vacuum, so the seal has to be airtight to block moisture. Start with the same pre-step: make sure items are completely dry, and smooth out wrinkles. Most reusable bags have a hook-and-loop (Velcro) seal or a snap-and-lock seal. For hook-and-loop seals, lay the bag flat, align the two sides of the hook and loop, and press firmly along the entire length, not just the middle. Run your finger over every inch of the seal to make sure no lint or fabric is caught—even a small piece of pet hair can create a 1mm gap. For snap-and-lock seals, press each snap closed one by one, starting from one end and moving to the other, to ensure even pressure. After sealing, test it by blowing into the bag: if it inflates, the seal is not tight enough. Press out the extra air and re-seal. Another trick for reusable bags: add a small moisture absorber packet inside the bag before sealing—these are available from most home goods stores, and we include a free pack with every large bag we sell. They absorb any small amount of moisture that might get past the seal, adding an extra layer of protection.
Now, let’s talk about the common sealing mistakes that even experienced users make. First, storing bags horizontally in a closet or garage—wait, no, the mistake here is not securing the seal after moving. If you move a compressed vacuum bag, the jostling can sometimes loosen the valve seal, so I always tell customers to double-check the valve every time they move a bag, and re-zip the zippers if they’re at all loose. Second, overstuffing the bag. I see this all the time: customers cram 10 sweaters into a bag designed for 5, stretching the seal track so it doesn’t close properly. That’s a quick way to ruin a $150 cashmere sweater. Follow the weight limit listed on your storage bag—we print clear weight limits on every bag, because overstuffing creates gaps in the seal. Third, not labeling the bag after sealing. It might not seem like a sealing mistake, but if your seal fails, a labeled bag lets you identify what’s inside quickly, instead of digging through 10 unlabeled bags to find your winter coat. Fourth, ignoring long-term storage needs. Even a perfectly sealed bag won’t protect items for 10 years if it’s stored in a damp basement. I always tell customers to keep storage bags off the floor (use a shelf or wooden pallet) to avoid ground moisture, and store them in a cool, dry area, not an attic that gets 120 degrees in the summer.
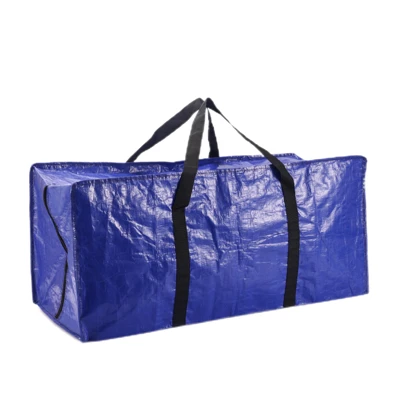
Now, let’s address a question I get all the time from customers: do I need to use tape to seal my storage bag? The short answer is no—if you sealed it properly, tape is unnecessary and can leave sticky residue on the bag when you open it. But if you’re storing items for 5+ years and want extra peace of mind, a small piece of painter’s tape over the zipper ends can help lock it in place. Just make sure you don’t use duct tape, which is too sticky and can damage the bag’s seal track when you remove it.
Laminated Bag As a storage bag supplier, my goal isn’t just to sell a product—it’s to help you use it correctly, so your items stay safe and intact. I’ve seen firsthand what happens when a seal fails: a customer’s baby’s christening gown ruined by mildew, a vintage quilt stained by dust, a winter coat chewed by moths. All of these could have been avoided with a proper seal. If you’re looking for high-quality storage bags, whether vacuum-sealed for compression or reusable for regular access, we have a range of sizes and types to fit your needs. We also offer custom sizes for bulk orders, perfect for homeowners, event planners, or retail businesses. Whether you’re storing out-of-season clothing, holiday decor, or sentimental items, a proper seal is the first step to protecting them. If you’re curious about which type of storage bag works best for your items, or have questions about sealing techniques, reach out to our team to talk through your needs. We’re here to help make your storage experience stress-free, no more ruined items or wasted closet space.
References
- Textile Storage Guidelines, National Institute of Conservation
- Household Mold Prevention, Centers for Disease Control and Prevention (CDC)
- Storage Product Seal Integrity Testing, International Storage Association
- Pest Prevention for Stored Goods, United States Department of Agriculture (USDA)
Jiade (Wenzhou) Daily Necessities Co., Ltd.
As one of the most professional storage bag manufacturers and suppliers in China, we’re featured by quality products and good price. Please rest assured to buy bulk discount storage bag from our factory. We also accept customized orders.
Address: Building2, No.1299, Keji Road, Longgang City, Wenzhou City, Zhejiang Province, China
E-mail: lhf@lianhaibag.com
WebSite: https://www.jiadebag.com/
