If you’re running a sheet metal cabinet supply business, you know that one size rarely fits all when it comes to storage. We regularly get calls from clients who have bought a standard cabinet from us, only to realize a week later that their parts, tools, or supplies aren’t organized the way they need. That’s where adding a custom partition comes in. A well-installed partition turns a single, empty cabinet into two functional spaces, eliminates wasted room, and keeps small items from sliding around when the cabinet’s on the move. Over the past 12 years building sheet metal cabinets, I’ve installed countless partitions for both our in-house projects and client installations, and I’m breaking down the process step-by-step so you can do it yourself. Sheet Metal Cabinet

First, let’s talk about why this isn’t a “grab a piece of plywood and screw it in” job. Sheet metal cabinets are built with precision—their frames are welded, their walls are bent, and their weight is balanced to hold 500+ pounds without bending. A partition that’s cut wrong or installed poorly can throw off that balance, cause the cabinet to warp over time, or even leave you with a gap big enough for a wrench to slip through. We always use materials that match the cabinet’s own construction, and we follow measurements that align with the cabinet’s original bends to ensure a tight, rattle-free fit. The best part? You don’t need fancy tools or any metalworking experience to pull this off—just a few basic items, some careful measuring, and a little patience.
Let’s start with the prep work, because skipping this step is where most people go wrong. Before you touch any tools, grab the cabinet and clear out whatever’s inside. If it’s a wall-mounted cabinet, you’ll want to temporarily remove it from the wall to make measurements easier—just take off the doors, unbolt the mounting brackets, and set it on a flat workbench. A level work surface is non-negotiable here; if your cabinet’s sitting crooked, your partition will be too, and that’ll lead to gaps when you try to close the doors. If you don’t have a workbench, even a thick sheet of plywood on sawhorses will work, as long as it’s flat and doesn’t wobble.
Next, you’ll need three sets of measurements. The first is the interior width of the cabinet’s main body. Slide your tape measure from the back wall to the front lip, right along the bottom rail. Don’t just measure the top or middle—sheet metal cabinets are often manufactured with a slight taper (it helps the doors close better), so measuring at the bottom gives you the most accurate number. Write that down. The second measurement is the total height of the cabinet’s interior, from the bottom base to the top flange, minus 1/8 inch. That extra room gives you a little flexibility when you fit the partition, so you don’t have to force it into place. The third measurement is the space between the side walls, same as the width.
Now, choosing the right material for your partition. We recommend matching the thickness of your cabinet’s metal—most of our standard cabinets use 16-gauge or 18-gauge steel, so a sheet of 16-gauge steel cut to size will blend perfectly with the cabinet’s weight and durability. If you only need a lightweight divider for small parts, 18-gauge works, but avoid anything thinner than 20-gauge—it’ll bend under even a light load. You can pick up a custom-cut sheet from your local metal supply shop, or if you’re comfortable with a metal shear, cut it yourself from a sheet of steel. Just make sure the edges are smooth—sharp burrs can scratch your hands and wear through things like fabric tool rolls over time.
Once you have your cut partition sheet, it’s time to make it fit securely. The easiest way to hold it in place, without welding or permanent modification, is to use self-clinching fasteners or cabinet shelf clips. We prefer shelf clips because they’re reversible—if you ever need to rearrange your storage later, you can just pull the partition out and reposition it without damaging the cabinet. To install the clips, mark the inside of the cabinet’s side walls where you want the partition to sit. For most jobs, 12 inches from the bottom is a good height, but adjust based on what you’re storing—if you’re separating large power tools, go higher; small hardware bins, lower. Drill a small pilot hole (1/8 inch is perfect) at each mark, then press the clip into the hole until it snaps flush with the wall. Repeat on the opposite side.
Slide the partition sheet into the shelf clips, and test the fit. It should sit tight against the clips, with no wiggling side to side or top to bottom. If it’s too loose, you can add a small piece of rubber weatherstripping along the bottom edge of the partition—this not only fills gaps, it also quiets any rattling when the cabinet’s being transported. If it’s too tight, just file down the edges of the partition a little until it slides in easily. Don’t force it; if it’s binding, you’ll risk bending the metal or warping the cabinet frame.
Now, if you want a more permanent installation—say, for a cabinet that’s going to hold heavy equipment that would tip without a solid partition—you can skip the shelf clips and weld the partition in place. This is a bit more work, but it’s worth it for high-use applications. To weld, first set the partition in place and clamp it to the cabinet’s bottom and side rails. Use a tape measure to double-check that the partition is square—measure the diagonal from top-right to bottom-left, then the other diagonal, they should be equal. Once it’s square, use a MIG welder to tack the partition to the bottom rail and the two side rails, then run a full bead along each joint. Let it cool for 10 minutes, then sand the welds smooth so they don’t scratch whatever you put in the cabinet.
Wait a second—what about the doors? A lot of people forget to account for the doors when installing a partition. Once your partition is in place, test closing each door to make sure it doesn’t hit the divider. If it does, you might need to trim a half-inch off the front edge of the partition, or adjust the door hinges slightly to pull the doors in. We’ve caught this mistake on more than one project—early on, we installed a partition in a job-site cabinet, and the door swung right into the divider, leaving the client with a gap they had to fix. Testing the doors before you finish the install saves you a lot of headaches later.
Now, a few pro tips from working with sheet metal cabinets for over a decade. First, always account for future use. If you might need to move the partition later, use shelf clips, not welding. If you’re installing multiple partitions in one cabinet, make sure to leave at least 2 inches between each partition so you can pull items out without hitting the divider. Second, paint the partition to match the cabinet. Most cabinets come with a powder coat finish, so pick up a spray paint made for metal (we use Rust-Oleum’s industrial enamel for our cabinets) and paint the partition before you install it. That way, you don’t have to touch up paint around the edges, and it won’t rust if you spill oil or water in the cabinet. Third, add a lip if you’re storing small parts. If your partition is going to separate hardware bins, bend a 1-inch lip along the top edge of the partition, so small screws or bolts don’t slide over the edge and fall into the other section. A metal brake makes this easy, but if you don’t have one, you can use a vise and a wooden block to bend the lip carefully.
Let’s talk about a common mistake we see clients make when installing their own partitions. They buy a piece of cardboard or plywood, cut it to size, and stick it in. That works temporarily, but plywood swells if it gets wet, cardboard rots, and neither is strong enough to hold heavy items. Another mistake is installing the partition too close to the doors, which leaves a small gap that you can’t use for storage, or too close to the back, which makes the front half of the cabinet useless. Taking the time to measure twice, test the fit, and match the material to your cabinet will save you from having to redo the job later.
We’ve done dozens of custom partition installs for our clients, and the feedback is always the same: it changes how they use their cabinet. One client, a local mechanic, added a partition to his wall-mounted cabinet to separate wrenches from sockets, and he said he cuts his prep time for jobs by 10 minutes every day. Another client, a construction company, added two partitions to their large job-site cabinets to keep small parts like bolts and nails organized, and they lost half as many parts as they used to. That’s the point of a partition: it turns a generic storage box into a tailored space that fits your needs.
If you’re not comfortable installing the partition yourself, or you want a custom design that works specifically for your cabinet, our team can help. We’ve built sheet metal cabinets for over 12 years, and we do custom modifications like partitions, shelves, and drawers for clients across industries—from small garages to large construction sites. Whether you need a single partition for a residential tool cabinet or a series of partitions for a warehouse storage setup, we can design and install it to match your cabinet’s strength and finish.
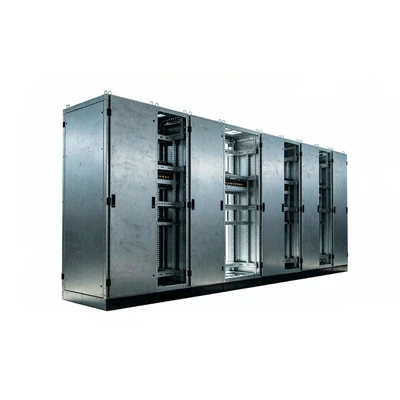
When you’re ready to add a partition to your sheet metal cabinet, don’t cut corners. Rushing the measurement step, using the wrong material, or skipping the door test can lead to a partition that doesn’t work as well as it should. We’ve seen too many clients throw away money on a bad partition install, and it’s such an easy fix when you take the time to do it right. A well-installed partition isn’t just a piece of metal—it’s a way to make your storage work for you, instead of the other way around.
Sheet Metal Cabinet If you’re interested in custom cabinet modifications like partitions, or you’re looking to upgrade your storage with a new sheet metal cabinet, get in touch with our team to discuss your needs. We’ll help you pick the right materials, design a layout that fits your space, and make sure the final product is strong, functional, and tailored exactly to what you need. Don’t settle for a generic cabinet when you can make it work for your specific tools, parts, or supplies.
References
- "Sheet Metal Cabinet Construction Standards," Industrial Metal Fabrication Association, 2021.
- "Custom Storage Modifications for Metal Cabinets," Journal of Industrial Storage Solutions, Vol. 14, No. 3, 2022.
- "Best Practices for Installing Interior Partitions in Metal Storage Units," Workshop Equipment Guide, 10th Edition, 2023.
Hefei Excellent Intelligent Technology Co., Ltd.
As one of the most professional sheet metal cabinet manufacturers in China, we’re featured by quality products and good service. Please rest assured to wholesale bulk customized sheet metal cabinet made in China here from our factory. Also, pricelist is available.
Address: No. 3 Jingyi Road, Douzhen Industrial Park, Gangji Town, Changfeng County, Hefei City, Anhui Province
E-mail: 1637201948@qq.com
WebSite: https://www.cnakst.com/
